Site Server can directly work the camera which support ONVIF or RTSP protocol. Please contact your camera’s supplier to confirm whether the camera support these two protocols.
The steps below show you how to load cameras SDK on Site Server.
i. Start IP Camer Setup Wizard


The IP Camera Setup Wizard is located in the GEAR icon where on Site Server
ii. Enable the brand that you need

Please at least select ONVIF and RTPViewer if you cannot find the one you need. Then finish this process.
iii. Create a connected IP camera on Site Server

Please wake the Preferences menu up by clicking the GEAR icon. Then select the label which has IP on it, and then click the IP Camera List button to search camera or add manually. Please do not forget to enter the account information. This information is same to the one you log in to the camera. Note: Some cameras require you to create an account to transmit video streams. If the camera equip microphone, please enable the audio feature here.
iv. Connect the added IP camera

All the camera that you’ve added can be found in drag down list. We support two different video streams for displaying and recording at the same time. We suggest our customer to work with this mode to save the system performance, if the Site Server works with many cameras. The best working environment is the CPU and HDD usage are below 75%.
There are so many reasons may cause Video Loss. In most cases, this issue is caused by the unstable Intranet. Please make sure the bandwidth in the Intranet is enough. The video streaming will not good and smooth. Site Server may try to reconnect the IP camera very often. If this issue can be solved by disconnecting most of the camera, the problem should come from the intranet bandwidth. The cases below is not come from the bandwidth.
Nothing on the Live Video and Playback
The video from the camera has been dropped by Site Server. One of the reason for this issue is due to the video size changed automatically all the time. This kind of video resource is hard to deal on CPU or Graphics Memory. Please try to work with another video resolution, or change the decoder on the IP camera.
Nothing on the Live Video, but Playback
The video needs Graphics Memory to show on the screen. When the Graphics chipset is not good enough, You can only see black screen on Site Server. In order to solve this issue, please add an extra Graphics card on this NVR server, or use the lower quality of the video streaming. You can also try to enable “DDRAW_EMULATION”in huperlab\hupervision\bin\LiveTag.ini.

Caution:
This function will lower the display quality and let the CPU dandle the display process. If the CPU usage is over than 75%, we suggest you purchase a display card.
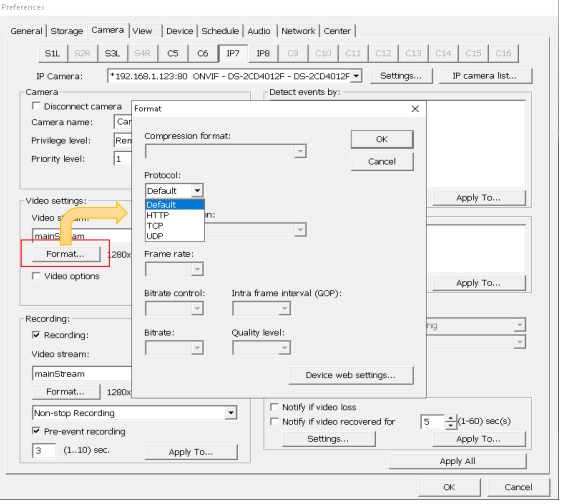
Each IP cameras have its own Network protocol for transmitting the video stream. Depending on the camera, it may use TCP, UDP, or HTTP. If you can ensure this issue does not come from the network issue, please try to switch the protocols from Preference -> Camera. The currently protocol that Sit Server selects may not be suitable for the IP camera.
However, if the camera has been integrated, please confirm the system does not keep busy. When the system really busy to handle other program, the Site Server may not take enough resource from CPU and start to drop the video.
Site Server may lose the connection with the IP camera sometimes. But frequent should not more than 5 times in an hour. Please check out the status on your camera, and try to find the best way to solve it.
I. Loss the Video so Many Times
Each IP cameras have its own Network protocol for transmitting the video stream. Depending on the camera, it may use TCP, UDP, or HTTP. If you can ensure this issue does not come from the network issue, please try to switch the protocols from Preference -> Camera. The currently protocol that Sit Server selects may not be suitable for the IP camera.
II. The Firmware on the Camera Has Been Upgraded
huperLab will keep integrating different camera’s SDK. But we do not suggest that customers to upgrade the camera firmware, if the whole system is working properly. If the IP camera does not work well after upgraded the firmware, please use the ONVIF protocol to work with.
III. The Video Quality Has Been modified once
Even most of all IP camera supports ONVIF protocol. But it is not every video streams on the IP camera completely support ONVIF protocol. If Site Server receives this kind of data, Site Server will not process it.
The only way to fix this issue is modifying the setting on IP camera setting page. Some IP camera may name the setting as Profiles, Encoder, or Format. Please give it a try on each settings.
Site Server can automatically and frequently reconnect to the unstable IP camera. Sometimes the video loss issue or missing the connection is due to the compatibility issue. Sometimes these kinds of issue can be solved after rebuilt the connection. Please find the “IPCamReconnect” at C:\huperlab\hupervision\bin\MManager.ini .

You can find 16 entries in this file. Every entry belongs to a camera setting (Cam0~Cam15. 0 means camera 1.). The unit of the “IPCamReconnect” is Second. After you set the time on each IP camera in this file, Site Server will rebuild the connection regarding to the time you set.
If the IP camera’s digital IO supports ONVIF protocol, Site Server can work with it, too. Please confirm with the camera supplier.
If the digital IO does not support ONVIF protocol, please contain huperLab’s partner and the camera supplier in your country. We need to integrate this camera’s SDK.
The steps below can guide you how to enable IO on Site Server.
i. Enable input or output on Site Server

Please open the Preferences menu by clicking the GEAR icon. Then, select the DEVICE tab and choose NetDevDIO-1 at dragdown list. If you have more than one Site Server on the same machine, you can see NetDevDIO-1, NetDevDIO-2, and so in the list. Please make sure each Site Server has the correct and unrepeatable one.
The input and output order are same to the camera channel. Please make sure which IO is connected to the device.
ii. Pair the camera and IO

All of the camera on same Site Server can share the same IO which has been enabled even the camera does not equip digital IO. We can make one of the camera receive input signal from other camera’s digital input. Then send output signal to the device which is connected to one of the camera on the same Site Server.
Site Server supports ONVIF Profile S that defines how the PTZ works. If your cameras uses the same protocol, Site Server can directly control the PTZ.
If your camera does not support profile S, please contact our partner in your country to apply camera integration process.
The steps below guide you how to enable the PTZ function on Site Server.
i. Open PTZ Control Panel

If you work with huperVision 40000, you can directly see it on the main panel. If you work with huperAnalyzer, please find it by clicking the Gear icon.
ii. Define the camera as PTZ camera

Please click the WRENCH button and enable the PTZ function on the channle which connect to a PTZ camera. If this camera uses the ONVIF potocol, you do not need to select the Device Type at the right side. What if you connect to a integrated camera, please select the correct camera to work with.