
Holding “Ctrl+F” on Site Server can open a Data Rate list. It can show you how many data is recorded in an hour or in a day. It can help you purchase the HDD.

If the camera an IP camera, you can calculate the data rate easily by the video setting. The Video Bitrate Limit means that the maximum data rate per second. If the Video Frame Rate is reduced, the capacity of the video recording is reduced, too.
Without any special license, Site Server can have addition event notification after the Site Server occurs unusually behavior. The options below are the notifications that Site Server can do.
If Site Server version is huperVision 4000, Video Loss & Video Recovery event are standard features, you do not need to enable them manually. It will be record in the event list on Site Server.
If Site Server version is huperAnalyzer, please manually enable these two feature at C:\huperlab\hupervision\bin, and names SSDimensionAnalyzerSetup.ini.

User can also make this feature have different response on each camera. Please set them on each channel at preferences page.

This type of notification will not let you know on event list. It also needs to enable manually. Please find the General tab on Preferences menu.

These event are different than the Video Loss event, some System Event Notifications such as OS breakdown, can only let you know by a message box after Site Server is ready.
Backup Scheduler
You can find this app under hupervision folder where is at Startup Menu.
Backup Scheduler has two different mode. They are both able to save the data at Local HDD or NAS in LAN.
I. Backup now
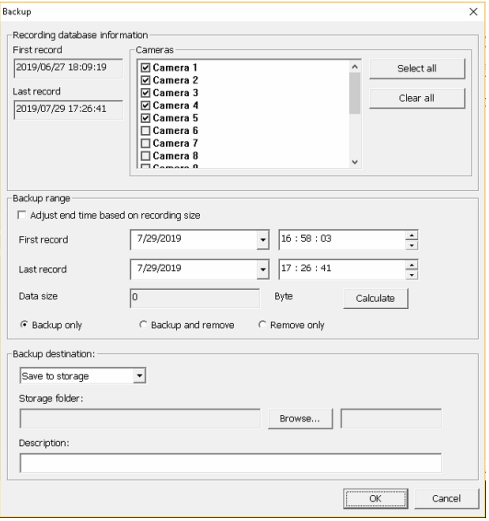
Picking up the time interval and the location where you want to save the data, then start the process.
II. Routine backup
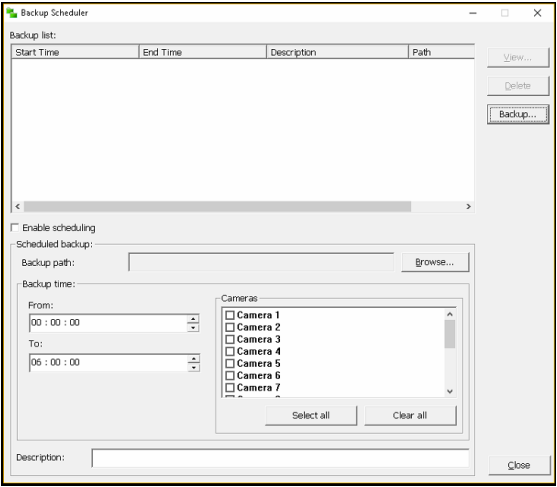
Selecting cameras that you want to back up, then set the working time and where you want to save the data, and then keeping it work at background. To avoid the bandwidth issue and priority issue, please ensure each Site Server’s backup schedule is separated.

This feature can automatically copy the database for the entire day to the location you set. Regarding to Windows rules, if the location is a NAS or a web drive, you need to create the shortcut or access that location once on the same machine where Site Server also on it first. Otherwise you cannot successfully set it up on Site Server.
While you select the location that you want to save the database, please ensure each Site Server’s database is saved on different location or folder. Please do not save in the same place.
Please don’t forget to enable “Search video recording on secondary storages automatically”. After that you can see the video recording which located in local storage and Secondary Storage on Record Player at the same time.
We also recommend you to separate each Site Server’s routine backup time. It can avoid the bandwidth issue.
The photo below can guide you how to change the time.

You can find this configuration file at C:\huperlab\hupervision\bin. If you have more than one Site Server on the same machine, you can see multiple bin folder in hupervision folder.
You can find the Video Options where is in Preference menu => Camera tab. All the info can be recorded in image, too.

Every e-mail server has its own security level. Site Server can send the report without e-mail server. However many of e-mail service may block this kind of e-mail. In case of occur this issue we might suggest you login your e-mail account on Site Server.

You can find this page on every different kind of notification function.
You can change the format when you select the location to save the video clip.

You can drag and drop the video to different location on Site Server. You can also set them at Preference=>View. According to different methods to change the layout, please find the suit way to reset them.

Directly open the right button list and choose “Reset Layout” to make all video in default.

You can find this page by clicking the Gear icon=>Preferences menu=>View. First, you need to find which screen on Site Server is mess up. Then make sure each channel has only one and correctly camera on View Tab. If any channel contains more than one camera, it will switch all image you set on it.
Site Server may crash after the system resolution is changed.
The options below may cause Site Server to crash.
Some KVMs will completely disconnect the monitor signal after you switch to another computer. This situation makes the system back to default resolution and make Site Server crash. Please minimize Site Server before you switch to another computer.
Remote Access Tool such as Microsoft Remote Desktop, uses virtual memory as display memory. It also logs out Windows after you disconnected. After Windows is locked, it makes Site Server crash sometimes. To avoid this issue, please minimize Site Server before you log out.
Some DP(Display Port) completely disconnect the signal between the DP and Monitor after turned off the monitor. After the signal is missing, Windows turns the resolution back to default. Please follow the options below to solve it.
I. Turn off the Deep Sleep on Video Card software control panel
Some graphics card is able to change the setting on control panel. Please find turn off the Deep Sleep feature on the control panel.
II. Turn off the Deep Sleep on monitor
Some monitor contains this feature for DP. It may call Deep Sleep or ECO Mode. Please find it and disable it.
If your device does not support any options above, we suggest you work with HDMI or DVI. You can also minimize Site Server after you done the job on Site Server.
Please hold the Windows button and R to wake Run.exe. Typing Shell:Startup on the text box, and then do it. Please copy the shortcut where is at C:\huperlab\hupervision\bin\StartMulti.exe.
The Task Manager in Windows 8 or later version contains Startup menu. You can directly enable or disable them instant delete them.

Please directly add the new HDD or modify the former one. If you wish the recording can be save on the hard disk one by one, please make sure all the configuration on each storage the same.
Please directly edit the size on each storage. However the space will not be released immediately. Please wait for the next recycle term. It will reduce automatically. Please try not to delete thedatabase manually.
NOTE :
If Site Server version is huperAnalyzer, please refer to the user manual.
Site Server contains many configurations that can make the display video invisible. Please make sure whether you can see the video on recording first. Then find the best way below to solve this issue according to the issue you have.
I. IP Camera
Sometimes the IP camera may cause the display video gone due to the video stream does not work, or the video stream contains damaged data. You can directly restart your IP camera to restore it. What if this issue occurs very often, please try to use different video resolution. You can also try to upgrade the IPCam-Addins from Software Updates.
This issue may also occur when the network bandwidth is not good enough. Sometimes the network device, such as Router or firewall in LAN may drop the video stream, too. Please try to restart your network devices.
II. Disconnect Your Camera
You can find this feature at the Preferences menu => Camera tab. It can disconnect with your camera on Site Server. Disable this item will restore the connection

I. Split Screens

You can find this feature from the Preferences menu => View tab. You can define how Site server displays each channel. If a split screen contains more than one camera, it will automatically switch all the camera image which it has.
Regarding to the drag down list, you can define these rules for 1, 4, 9, and 16 split screen layout. Please make sure each split screen at left side in those four different screen layouts contain at least one camera which is at right side. If any split screen does not contain any camera, it can only show you the blank screen.
II. Split Screen Blocks the Screen

Users can double click on any channel with left mouse button to scale the image. When up you may the same operation again on the maximum video, it will shrink to the regular size. Please make sure the no video situation isn’t because of one of the channel which doesn’t contain any video block the layout.
III. The Problem from Graphics Card
Sometimes the image on each channel could not be displayed was because of the graphics card driver. Trying to upgrade the driver may solve this issue. What if this issue is because of the performance not good enough, you can also try to add and addition graphics card instead of the on board graphics chip.
If this issue keep occurring, please try to enable the function below to solve it.

This feature, “DDAW_EMULATION” can only be found on Site Server version is above 1.7b or newer. It is located in C:\huperlab\hupervision\bin\LiveTag.ini. Please make the value to 1 then save the status and restart Site Server. If you still couldn’t see anything on Site Server, please make the “DDAW_ACCELERATION” to 0, then save the status and restart Site Server again.
There are serval reason that may cause the Record Player fail to display the video.
The solutions below guide you how to fix it.
I. The Recording Database is Damaged
Please use the DBTool.exe where is at C:\huperlab\huperVision\bin, to verify the database first.

During the DBTool is verifying the database, we need to shut down Site Server and Record Player.
When the DBTool discovers the damage in database, it will ask you how to do. You can directly delete them one by one or enable the “Automatically Fix Errors” let the DBTool delete them for you.
II. The Graphics Card’s Performance is not good enough
Sometimes the image on each channel could not be displayed was because of the graphics-chip’s driver. Trying to upgrade may solve this issue. What if this issue is because of the performance not good enough, you can also try to add and addition graphics card instead of the on board graphics chip.
If the situation keep occurring, please try to enable the blow function to solve it.
This function can only be found on huperVision and huperAnalyzer which the software version is above 1.7b or newer. It’s located in C:\huperlab\hupervision\bin\LiveTag.ini. The DDAW_EMULATION is the prioritized one, please make the value as 1 then save the status and restart the Site Server. If you still couldn’t see any of video being display, please make the DDAW_ACCELERATION as 0, then save the status and restart the Site Server.
Please press Ctrl+F on Site-Server’s main panel to open the Data Rate Calculator. It would be the easy way to know whether Site Server still to save the recording.

I. Making Sure You Enabled the Recording Function

You can find this page by clicking Gear’s icon=> Preferences menu=> Camera. Please makes sure the ‘Recording’ is enabled and the recording mode is what you want.
II. Making Sure the Storage You Set is Available

You can find this setting page by clicking Gear’s icon=> Preferences menu=> Storage. When the storage which you set is gone or unavailable, the storage does not appear on the list.
If the storage which you set still on the list, please select the Modify button and confirm whether every camera is still allowed to record its video on the storage.